.svg)
Remote Desktop and SSH Remote Login Setup
Pre-conditions
This guide describes the steps required to integrate remote machines with the VeroCard login process. It is expected that the reader is familiar with the VeroGuard Platform and VeroCard user set up across AD, AAD and Fido2 environments, and that the integrator has a pre-existing and activated VeroCard.
Before starting, ensure you have completed:
Initial integration with VeroGuard for your network environment.
Setup and activation of your VeroCard.
Relevant User Accounts on the remote machines.
Relevant resources created in the BoID for the remote machine for AD and Fido2.
An account with “sudo” privileges on the remote Linux machine.
Your VeroCard firmware must be 1078 or higher.
Overview
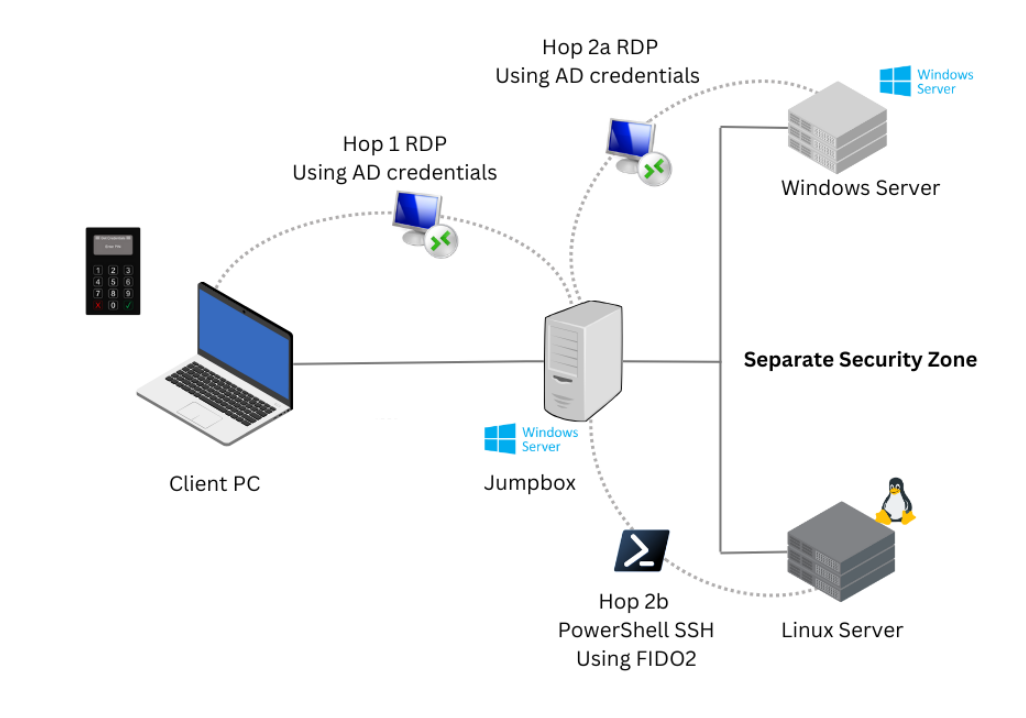
The VeroGuard Platform supports remote logins using a VeroCard via RDP to Windows based machines, and through PowerShell using SSH to Linux Servers. Typically, a user will initially access a Jumpbox via RDP and from there originate a second hop to access machines in a separate security zone. This document will guide the reader through the set up required for a 2 hop user scenario as shown below.
Integrating VeroCard Login for RDP
Client PC
Pre-requisites
Client is Windows 10 or Windows 11 with “22H2” or higher (webauthn redirection support).
A resource for the VeroCard user has been established in BoID for the account on the remote machine.
Guide is based on Windows 10 22H2 19045.2913
Client PC Setup
Install Serenity Virtual Channel RDP Plugin 1.0.140.0 or higher on the Client PC.
Install Serenity Companion 1.0.84.0 or higher on the Client PC.
Complete a Bluetooth pair with the VeroCard.
Installation of Serenity Companion and Bluetooth pairing are only required if using FIDO2 Authentication, which is used for:
Entra AD joined Windows Machines
SSH to Linux Machines
The latest versions of Serenity are available from Downloads.
Jumpbox Setup for Windows RDP Login with VeroCard
Pre-requisites
The Jumpbox machine must be on:
Either Windows 10 or Windows 11 with “22H2” or higher (webauthn redirection support),
Windows Server 2019 or Server 2022 with “21H2” or higher (webauthn redirection support)
This part of the Guide is based on Windows Server 21H2 20348.1668)
Jumpbox Setup
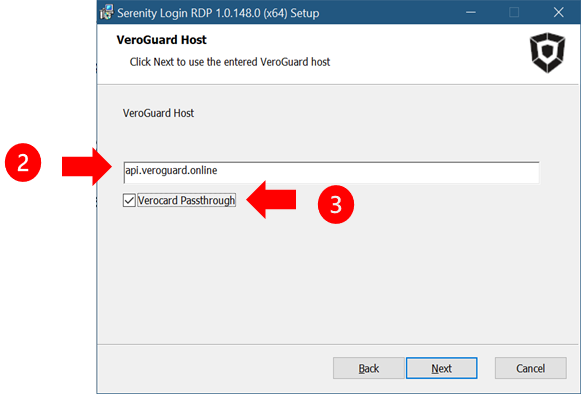
Download and install Serenity Login RDP 1.0.140.0 or higher on the Jumpbox
Enter the address of your VeroGuard Platform, or if using the hosted service, leave the default address setting
Make sure you select the VeroCard Passthrough option
Test Windows Endpoint RDP Login with VeroCard
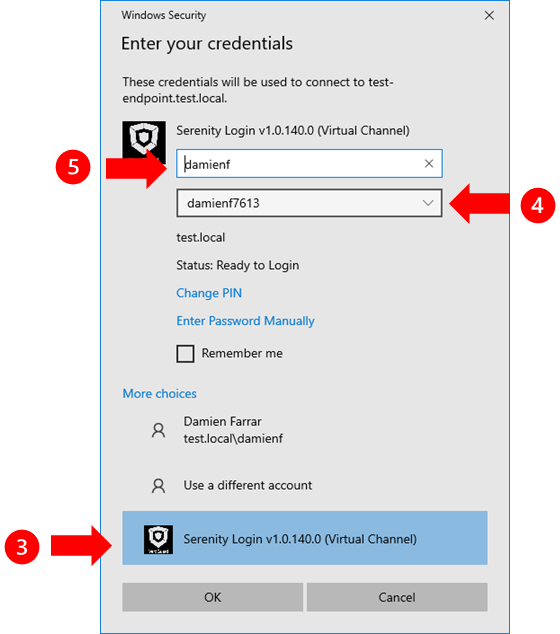
On the Client PC open Remote Desktop Connection and enter the address information for the Jumpbox.
Click on the More choices link.
Select the Serenity Login credential provider from the list.
Power on your VeroCard and then select it from the dropdown list
Enter the domain\username for the remote server and then click the OK button to begin the login process
Follow the prompts on the VeroCard to enter your PIN and login to the endpoint
Repeat the process above to login to another Windows server from the Jumpbox
 |  |
The Users account in the VeroGuard BoID must have relevant resources created for the user account(s) on the remote machine(s).
Integrating VeroGuard Login for Linux
Jumpbox Setup for Linux SSH Login with VeroCard
Prerequisites
Jumpbox requires the latest version of Win32-OpenSSH https://github.com/PowerShell/Win32-OpenSSH/releases as the included version of OpenSSH in Windows is unsupported.
Linux endpoint with OpenSSH 8.3 or higher
A resource for the VeroCard user has been established in BoID for FIDO2 for each endpoint “ssh:endpoint\openssh” replacing “endpoint” with the endpoint hostname. 3
User account and/or Admin (sudo) account on the Linux Box
Serenity Companion has been installed on, and the VeroCard Paired with the Client PC
The section of the guide is based on Ubuntu 22.04.2 LTS
The endpoint name used in the BoID Resource must be the same as the name used when creating the keypair. This can be created before or after you create the key pair in step 3 below.
Linux server setup
SSH to the Linux endpoint as a user with sudo privileges
Install the pam-u2f module using the following command.
sudo apt install libpam-u2f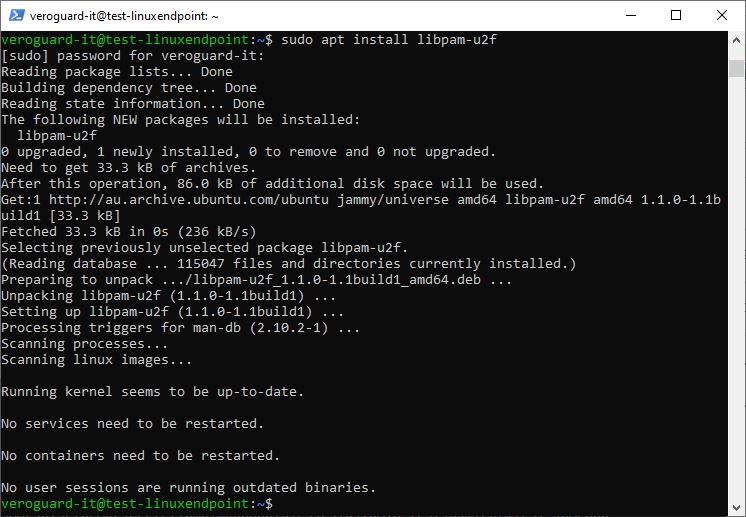
Add a new group “verocontrolled” and add the required user accounts to it.
sudo groupadd verocontrolled sudo usermod -a -G verocontrolled "username"
Edit the PAM sshd config
sudo nano /etc/pam.d/sshdInsert the following towards the top of the configuration, this enables authentication using a VeroCard using PAM
auth sufficient pam_u2f.so cue pinverification=1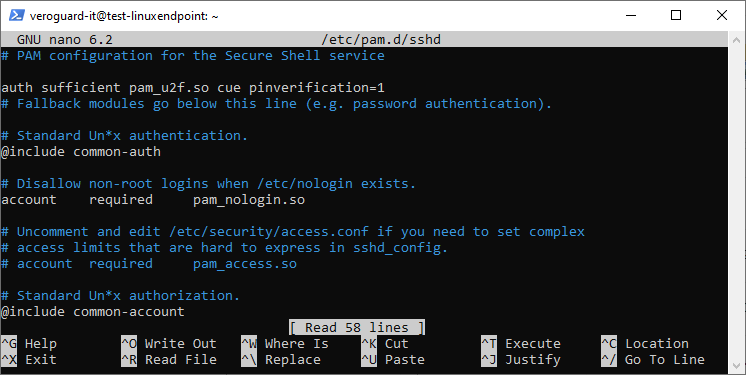
Edit the sshd_config and add the below configuration items to the bottom of the file.
sudo nano /etc/ssh/sshd_configMatch Group verocontrolled
AuthenticationMethods publickey #Only public key authentication allowed
PubkeyAuthentication yes #Allow public key authentication
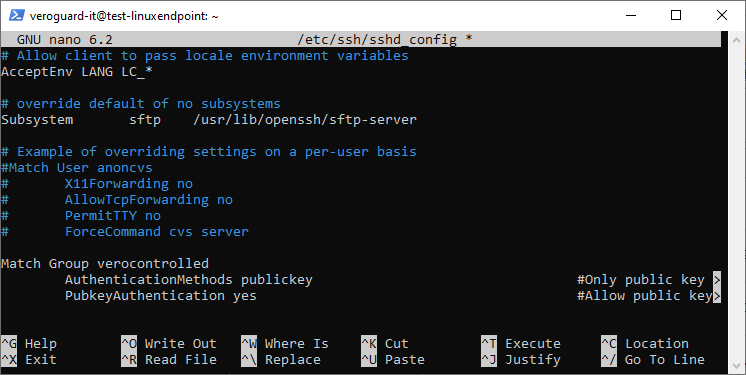
This configuration restricts users in the verocontrolled group from being able to use a password to login.
Restart ssh for the config changes to take effect
sudo systemctl restart sshOnce configured, any users added to this group will be required to authenticate with a VeroCard and will no longer be able to login with their password until they are removed from the group.
Assigning the Public Key to a User
With the server setup now complete, the public key created must be associated with the relevant user on the Linux machine.
Add the public key from the generated ecdsa keypair on the JumpBox in User FIDO2 Registration steps 3 to 9 to the users authorized_keys file on the Linux endpoint. Confirm using the below command.
nano /home/$USER/.ssh/authorized_keysThe $USER variable refers to the currently logged on user and should be replaced with the name of the user being setup if logged in as an administrator.
The .ssh folder may not exist for the user, giving an error when trying to edit the authorized_keys file. The .ssh folder can be created using the below command (sudo may be needed when replacing the $USER variable if required as mentioned above).
mkdir /home/$USER/.ssh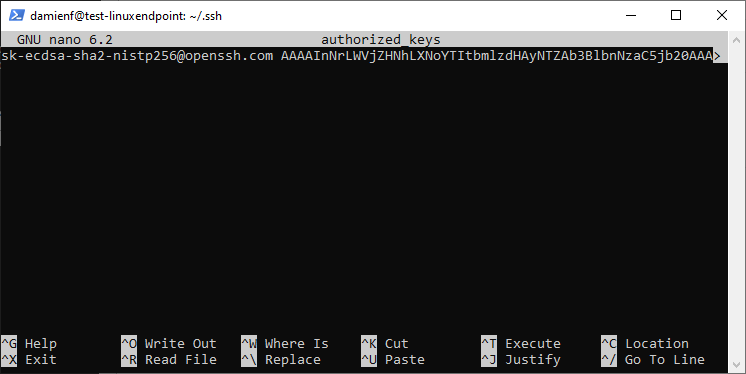
This action is required for each user to be able to access the Server. Users can generate the required keypairs on the Jumpbox and email the public keys to the Linux administrator for distribution to the required Linux Boxes.
User FIDO2 Registration
This section completes the creation of the FIDO2 keypair
Login to the Jumpbox server as the user you want to complete the FIDO2 registration with
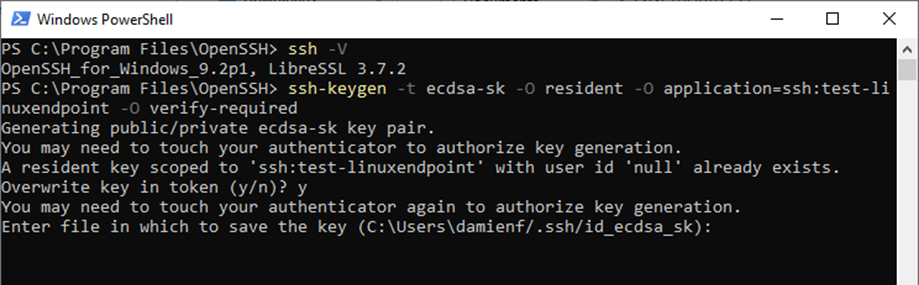
Open PowerShell and run the command “ssh -V” to verify that the latest version of OpenSSH is being used, upgrade if not.

Run the following command from the Jumpbox to generate an ecdsa keypair replacing “endpoint” with the endpoint hostname.
ssh-keygen -t ecdsa-sk -O resident -O application=ssh:endpoint -O verify-requiredEnsure it is run from Windows and not a logged on SSH session.
The value for the application arg must always begin with ssh: and the endpoint can be customised, for example, as a reference to the endpoint name but it can be named anything as long as it matches with the FIDO2 Resource URI that is set through the VeroGuard Admin Portal.
For example: If we called it ‘endpoint’ then the FIDO Resource URI would need to be named “ssh:endpoint” combined with “\openssh”. See screen shot below.
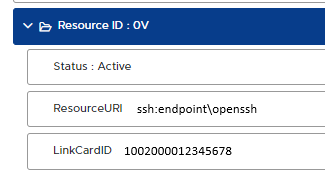
Setting the Resource URI in the VeroGuard Admin Portal
If the user does not already have a resource setup by the VeroGuard Admin then they will not be able to complete the FIDO2 Registration.
Please provide the endpoint details to the VeroGuard Admin so it can be added to the User's resource.
If you get a prompt to “Overwrite key in token”, enter “y” and hit enter as the VeroCard will store multiple keypairs.
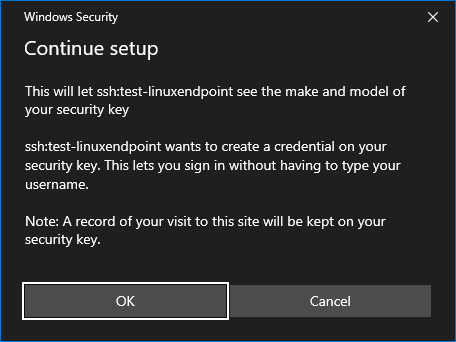
The Windows Security prompt for “Security key setup” will redirect to the Client PC.
Select OK and then OK again on the “Continue setup” prompt
 |  |
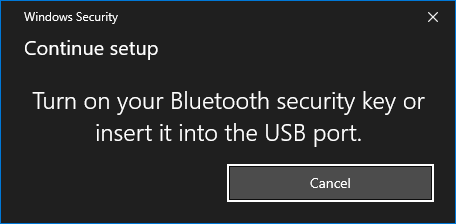
Turn on your VeroCard and wait for it to connect, the Windows Security prompt will update to show progress.
 |  |
The VeroCard will prompt you to “Enter PIN” on the Fido2 register screen. Enter your PIN and press the green tick button.
On success, the VeroCard screen will display “credentials created”
Save the generated keypair to the .ssh folder.
We strongly advise that the keypair file is named relevant to the endpoint and the User
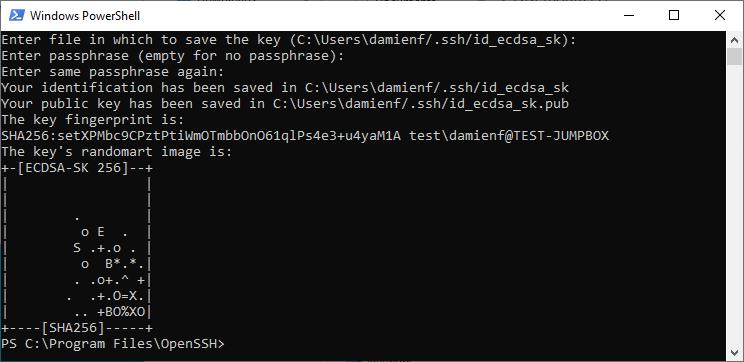
Notes on the generated Keypair files and their use:
The first file, id_ecdsa_sk, contains a reference to the private key credential stored on the VeroCard.
The second file, id_ecdsa_sk.pub, contains the public key which is used on a remote system to verify authentication.
Keys cannot be shared between VeroCards – the Private key does not leave the VeroCard.
It is possible to share a public key across multiple endpoints, so that a user can login to multiple Linux devices with the same credentials, however there can be only 1 resource for each endpoint URI in the BoID which could limit granular control.
Test Linux Endpoint SSH Login with VeroCard
Login to the Jumpbox server using a VeroCard
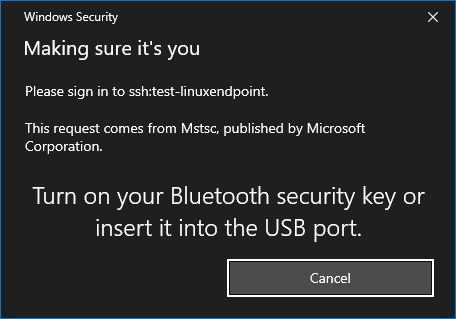
Open PowerShell and run the following command to ssh login with VeroCard
ssh user@server -i id_ecdsa_skIn the command above “id_ecdsa_sk” should be replaced with the path and name of the key that was created in 3.1.2 which is typically stored in the users .ssh directory.

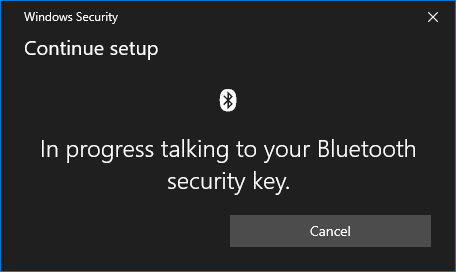
Windows Security prompt will redirect to the Client PC, ensure your VeroCard is powered on and paired to the Client PC.
 |  |
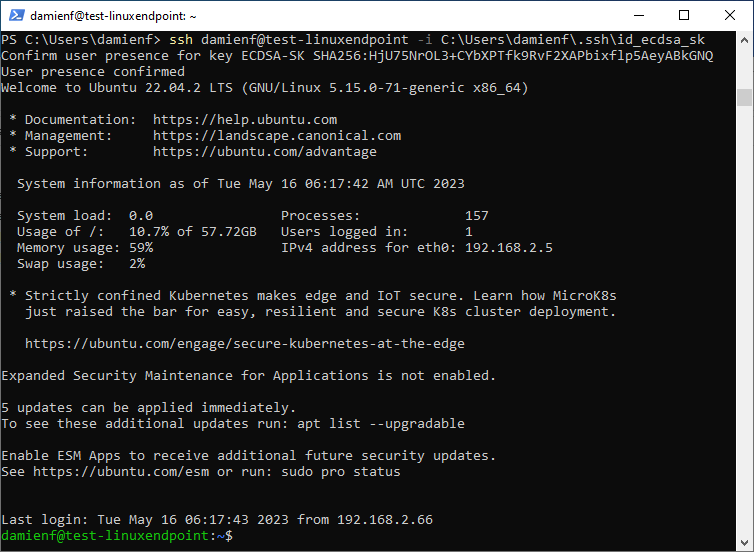
Enter your PIN on the VeroCard when prompted
On successful PIN verification the User will be logged in
Reverting to password login (recovery)
To allow a user to login with a password again instead of a VeroCard, simply remove them from the verocontrolled group.
SSH to Linux endpoint as user with sudo privileges and run the following command:
sudo gpasswd -d username verocontrolledRemoving the user from the group will allow them to login with either their password or VeroCard.
If the file “id_ecdsa_sk” is still present in the .ssh folder then the user will still be prompted to use a VeroCard but the dialog can be cancelled and then a password can be entered. This behavior will only occur when the key file is named using the default name “id_ecdsa_sk”.
If the key file has been named differently, then this won’t occur unless the “- i" command is used with the path to a key file.
Removing User Access
To remove user access from logging in with the VeroCard, the FIDO2 Resource should be disabled or deleted from the users account in the VeroGuard Admin Portal.
Recommendation
VeroGuard strongly recommends that Linux Administrator (sudo) accounts be protected with 2 VeroCards, so that a backup exists in the event the first VeroCard is lost.