Skip table of contents

VeroLink Installation Guide - for on Premises AD

This guide discusses how to prepare your environment for integration with the VeroGuard Patform.

VeroLink is a .net core application designed to support VeroCard's access to Active Directory (AD) services. VeroLink is configured to run as a Windows service on the Microsoft Windows 10 (or higher) or Microsoft Windows Server 2016 (or higher) operating systems. To work properly, the VeroLink machine must be a part of the client's domain and have access to the client's Active Directory. Interacting with Active Directory, VeroLink (on behalf of the user) performs two main operations:

  1. changes the user's password to a complex totally random 19 character string, and

  2. obtains user account data.

Once VeroLink is up and running, it tries to establish a connection to the VeroGuard server and remains connected indefinitely until its connection is terminated. If the connection is lost, VeroLink tries to reconnect the VeroGuard server.

Initial checks

Before starting, ensure that your environment meets with the following minimum requirements.

  1. A Domain Controller running Windows Server 2016 or higher.

  2. An Active Directory Domain Services (AD DS) environment, with or without Active Directory Federation Services (AD FS).

  3. An active internet connection; and

  4. Make sure you have obatined the Initial Client Secret from VeroGuard

Implementation Overview

This guide will take you through the following steps:

Note: Entra or Azure Active Directory Domain Services is not supported by VeroLink.

For setup an integraton with Entra please see XXXX

Select a machine for VeroLink installation

Select a machine for VeroLink installation

Summary of requirements

As noted above, VeroLink must be installed on a computer or virtual machine (VM) which is running either Microsoft Windows 10 (or higher) or Microsoft Windows Server 2016 (or higher). As also noted above, it must be installed on a computer or VM that is part of a local domain.

In addition to this, the computer or VM on which VeroLink is installed must be able to access, at minimum:

  1. port 389 of the primary domain controller of that domain; and

  2. port 443 at wss.veroguard.online (i.e. over the internet).

To satisfy the above requirements while maximizing security, we recommend installing VeroLink on a computer or VM which is on a separate VLAN and which has access only to the above noted ports for the above noted hosts (plus any other ports / hosts required for maintenance).

Identify VeroLink machine

In subsequent steps, you will need to grant permissions to the machine account of the computer or VM on which VeroLink has been installed. Accordingly, at this point you should identify the computer or VM on which you will later install VeroLink (taking into account the above requirements) and make a note of its host name.

It is suggested that you do not install VeroLink until you have completed the following section dealing with domain controller configuration.

Configuring your domain controller

Domain Controller Configuration Process

Background

In order for VeroGuard to function correctly, VeroLink must be able to and access and cycle users’ passwords. To do this, it must be given certain permissions on the domain’s primary domain controller.

VeroGuard will only be able to control passwords of users who have been added to the appropriate security group. By default, VeroLink will also only be able to control users who are not administrators.

If you wish to have VeroLink control administrators’ passwords you will need to take extra steps (see 3.4. below)

The next two sections describe how to create the appropriate security group, add users to it and give VeroLink the necessary permissions to access and cycle passwords for those users.

Set up OU and Security Group

While logged in to a domain controller on the relevant domain:

  1. open Active Directory Users and Computers;

  2. create an Organisational Unit (OU) name "VeroControlledOU" at the root of the domain tree. This will be the OU into which the new Security Group will be placed, then

  3. create a new Security Group named " VeroControlled", into which you will later place users who receive VeroCards.

At this point, you must identify each OU in which there are users who will be using a VeroCard (see above for default names). VeroLink must be given the appropriate permissions to read and cycle passwords for each such OU.

VeroGuard will not actually be able to manage the passwords of users in an OU simply because VeroLink has been given access to change passwords in that OU. To enable password changes for a particular user, the additional step of adding the user to the VeroControlled security group must be taken. See

For each relevant OU:

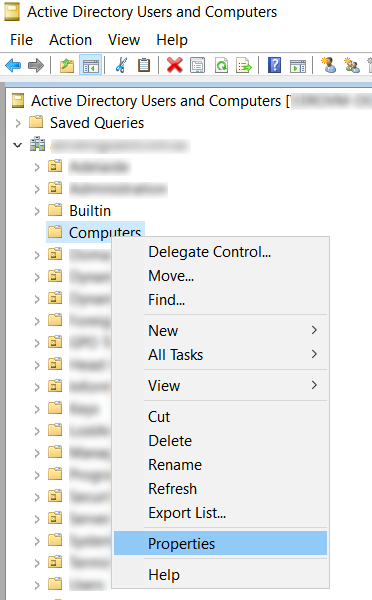
  1. In Active Directory Users and Computers, right click on the OU and from the drop-down menu, select “Properties”

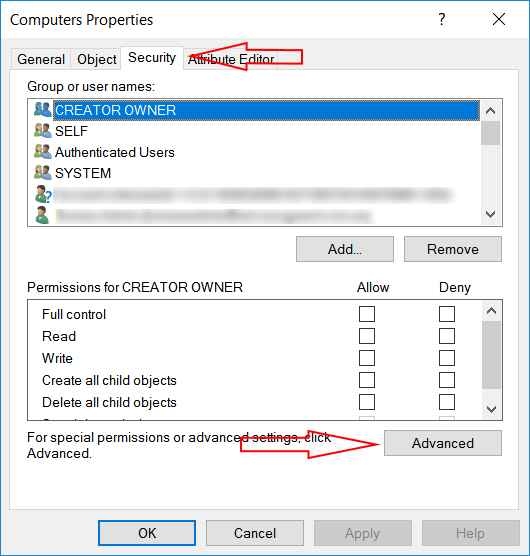
  2. In the resulting “Properties” window, select the “Security” tab and click the “Advanced” button at the bottom of that tab

Right click OU & select Properties

Select Security Tab & click Advanced

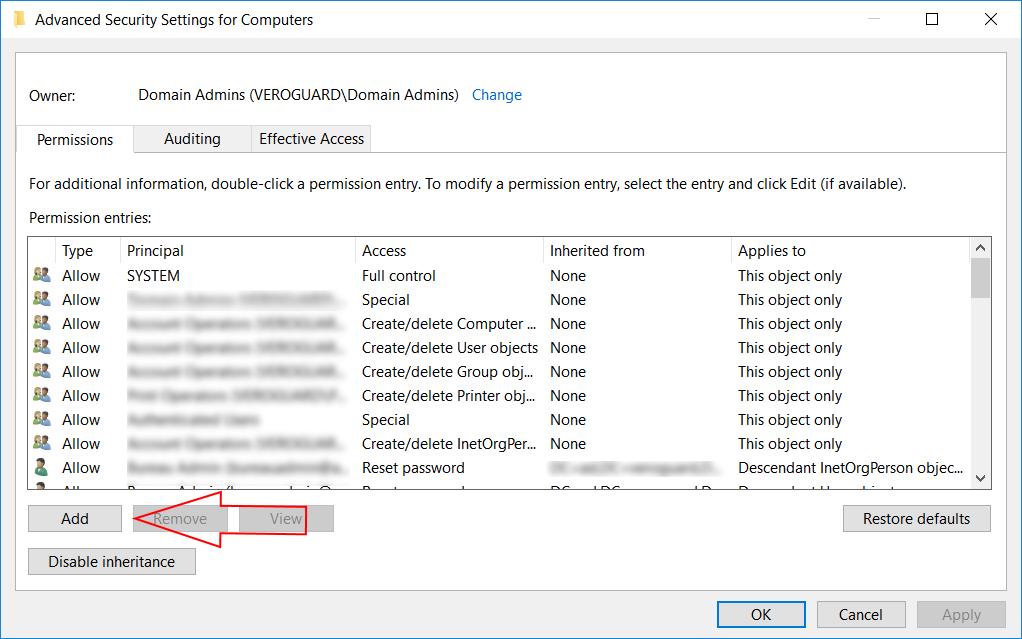
  1. The “Advanced Security Settings” windows should open on the “Permissions” tab. On this tab, click the “Add”, and on the resulting “Permission Entry” window, click “Select a Principal”

Click Add

Select a principal

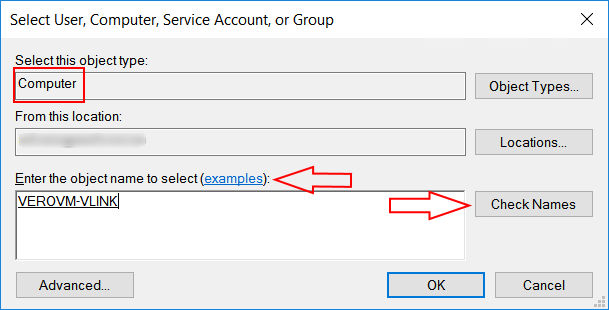
  1. In the resulting “Select User, Computer, Service Account or Group” window, click the “Object Types” button and select “Computers” and click OK.

You may also de-select all other object types, to make your search easier.

Click Object Types

Select Computers

  1. On return to the previous window, “Computer” is now selected as the object type.

  2. In the “Enter the object name to select” box, enter the name of the computer or VM on which VeroLink will be installed (in the illustration below, the name “VEROVM-VLINK” is used as an example).

  3. Click the “Check Names” button, which will validated if correct by being underlined.

  4. Once the name is validatedclick the “OK” button:

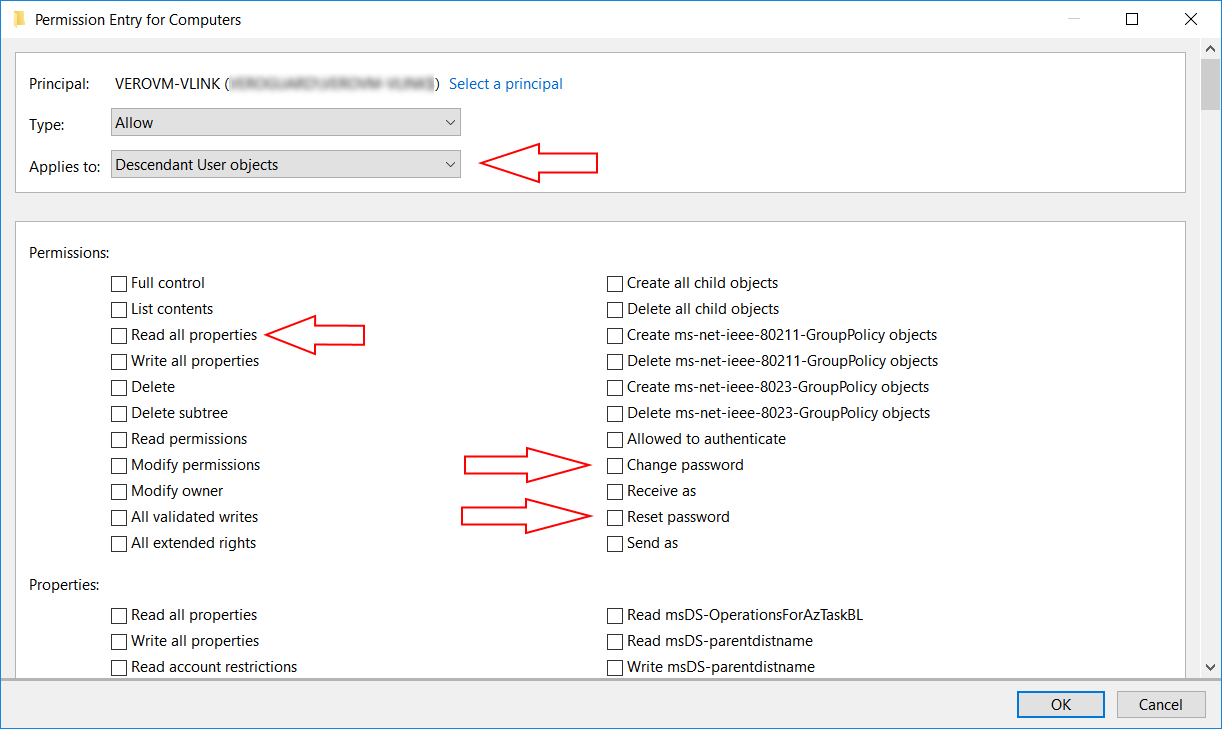
  1. A “Permission Entry” window will now be presented

    1. On the “Applies to” drop-down menu, select “Descendant User Objects”. The list of permissions and properties will then change.

    2. Under “Permissions” check the boxes for:

      1. Read All Properties

      2. Change Password and

      3. Reset Passwords

Note that change and reset password are two separate permissions, both of which are required

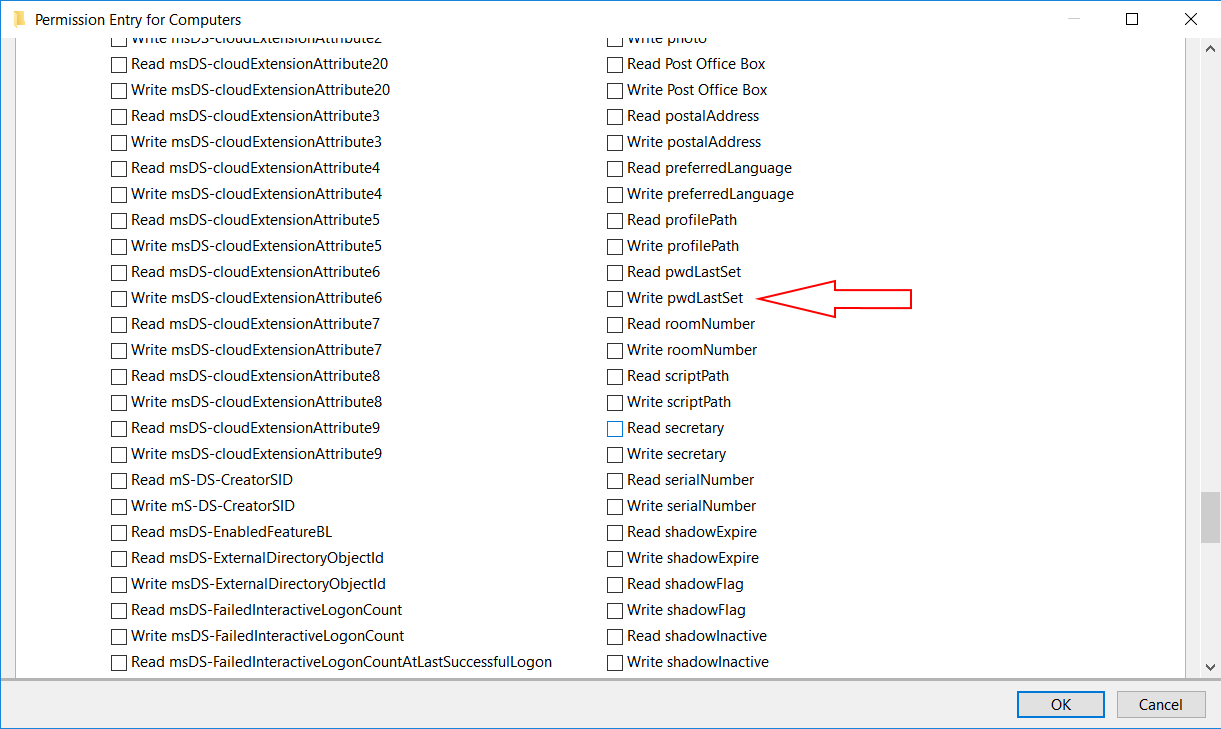
  1. Scroll down until you locate the “Write pwdLastSet” permission and check it.

  2. Click OK on this window and all other open windows until you have returned to the main “Active Directory Users and Computers” window.

This completes the necessary permissions for VeroLink to manage non-administrative users.

Considerations for privileged accounts

Considerations for priviledged accounts

There are two methods to enable VeroLink to manage Administrative Accounts, and you should carefully consider which method suits your organisations' security policies and requirements.

  • Method A is to create a new Admin User as a Domian Administrator and provide the account credentials to VeroLink.

  • Method B is to provide the VeroLink machine account permissions over the “AdminSDHolder” container.

Depending on your infrastructure and security environment, either method may introduce some risk to IT infrastructure. These risks are explained below, and you should abide by your company's security policies and frameworks to mitigate these risks, as you would with any priviledged account.

Method A: Create a new Admin User

Overview:

Create a new account as a Domain Administrator and provide the account credentials to the VeroLink application.

Configuration for Method A:

  1. create a new user in the relevant domain and give that user a strong password;

  2. set the user’s password so that it:

    1. does not need to change at next logon; and

    2. never expires;

  3. for each OU containing administrative users that you need to be controlled by VeroGuard, give this user all the same permissions that you provided to the VeroLink machine account in Step 9 Permissions

  4. Make a note of the priviledged user’s name and password, as these will be required in subsequent steps.

The advantages of this method (as compared to Method B below) are:

  • The machine account of the device where VeroLink is installed does not have any administrative rights.

    • Accordingly, if an attacker is able to compromise this machine account, they will not be able to use it to manipulate any administrative user accounts.

The disadvantages of this method (as compared to Method B below) are:

  • An extra Domain Administrator user must be created and its credentials must be recorded and stored.

  • User accounts are generally considered to be more vulnerable to compromise than machine accounts.

Method B: VeroLink rights to AdminSDHolder

Overview

Give the VeroLink machine account permissions over the “AdminSDHolder” container.

Configuration for Method B:

  1. give the VeroLink machine account all the same permissions over the AdminSDHolder container that you provided to it over OUs in Step 9 Permissions

The AdminSDHolder container holds the security descriptor templates applied to members of certain protected groups, such as Domain Administrators and Enterprise Administrators.

Accordingly, if VeroLink is given the necessary permissions over this container, it will be able to change the passwords of anything in this container – including administrative users.

The advantages of this method (as compared to Method A above) are:

  • No extra accounts are required to be created

  • Machine accounts may generally be less vulnerable to compromise than user accounts.

  • It is not necessary to record any administrative credentials outside of AD, potentially narrowing the window for credential theft.

The disadvantages of this method (as compared to Method A above) are:

  • The VeroLink machine account will have the permissions to change passwords for all administrative users and all other objects inside the AdminSDHolder container.

  • While VeroLink will not manage passwords for accounts that are not in the VeroControlled security group, if an attacker is able to gain control of the VeroLink machine account they will be able to change passwords for any and all administrative users in the relevant domain. This may allow the attacker to defeat attempts at remediation.

Add users to the VeroControlled Group

Add users to VeroControlled Group

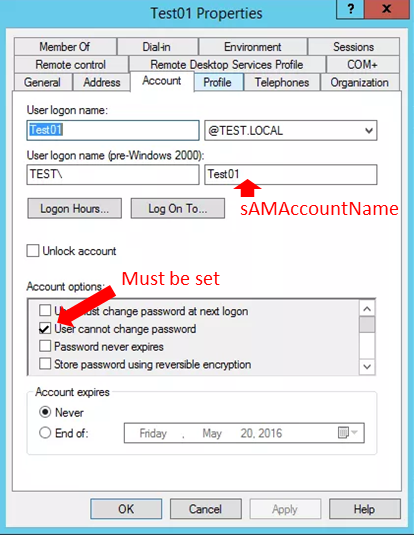
Before proceeding, please ensure that users that will be migrated to VeroGuar

  1. have a unique sAMAccountName populated within their AD account; and

  2. the "User cannot change password" attribute ticked

Example of correctly configured user properties

At this point, add each user who will use a VeroCard to the "VeroControlled" security group.

Only users who are added to this group can use VeroCards to log in to a Windows PC on the domain.

In the event you wish to override VeroGuard, you are advised to keep at least one Enterprise or Domain Admin account(s) outside of the VeroControlled group and keep the account's password securely stored.

VeroLink Installation

VeroLink Installation process

Installation of package

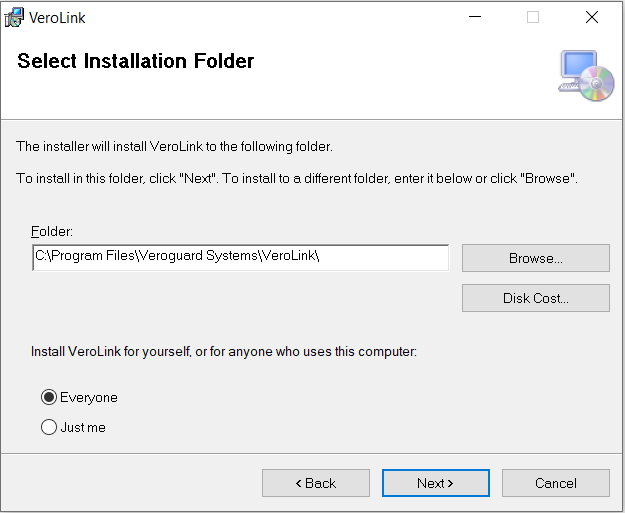
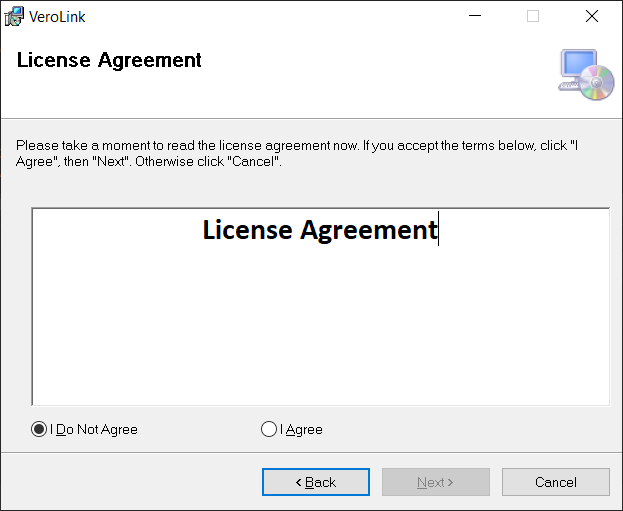
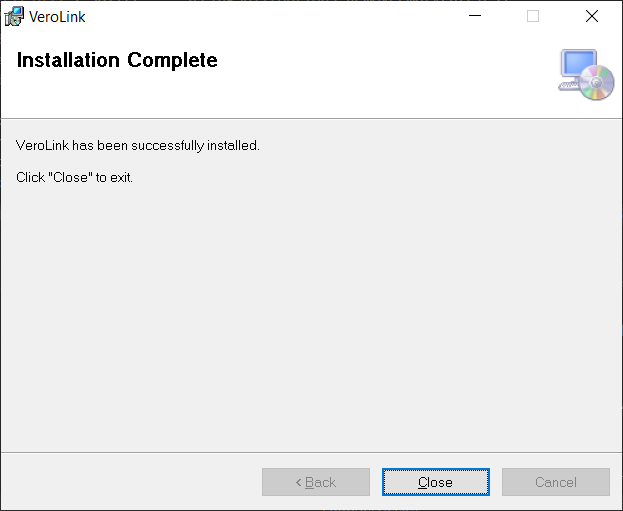
Once you have set up a computer or VM as suggested in earlier sections, copy the provided VeroLink installer to that computer or VM. Locate the VeroLink installer and execute it by double clicking on it, then follow the steps provided by the Setup Wizard.

The default installation locations is C:\Program Files\Veroguard Systems\VeroLink\

You will need administrative privileges to install VeroLink. If you are not logged in as an administrator of the relevant computer, you can right click on the installer, choose “Run as Administrator” from the drop-down menu, then provide your administrative credentials when prompted.

Verify installation

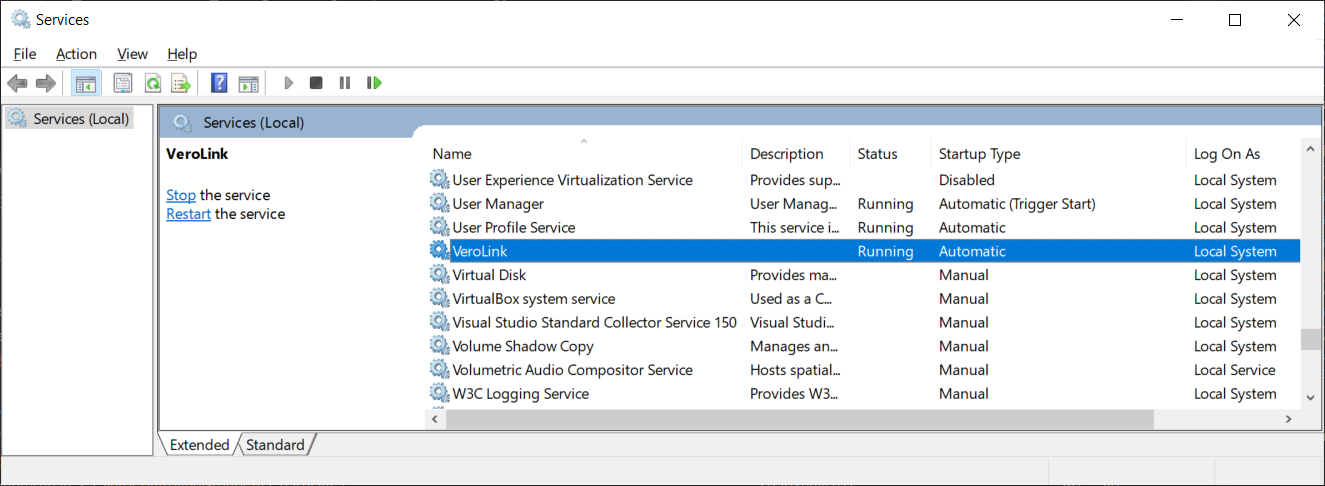
VeroLink installs as a windows service and will be started it in a ‘LocalSystem’ account context.

After the installation process is complete, you can open Windows Service Manager and ensure the VeroLink service is installed and running:

Configuring VeroLink

Configure VeroLink for your network environment

While still logged on to the computer or VM on which VeroLink is installed:

  1. Locate the file named “appsetings.Initial.json” and open it using “As Administrator” in a text editor

    1. appsetings.Initial.json is in the VeroLink install directory (by default C:\Program Files\Veroguard Systems\VeroLink)

  2. Search for and modify the following parameters, which by default will be set to "****"

    1. "Origin" – set this to your internal domain (e.g. "int.company.com").

    2. "ClientSecret" – set this to the initial client secret provided to you by VeroGuard

    3. "LdapServerConnection" – set this to the FQDN of your primary domain controller (e.g. "dc1.int.company.com").

    4. "LdapSearchBaseDn" – set this to the DN of base OU of the location at which you want VeroLink to be able to search using LDAP Data Interchange Format:
      e.g.: If your domain is "int.company.com" and you would like VeroLink to search the whole domain, this would be set to "DC=int,DC=company,DC=com"

    5. "MemberOf" – set this to the DN of the VeroControlled security group in LDAP Data Interchange Format
      e.g.: “CN=VeroControlled,OU=Security Roles,DC=int,DC=company,DC=com"

If you used Method A Settings

  1. Allow changes of administrative users’ passwords : If you wish to control administrative users with VeroGuard using Method A described above (this step is not necessary for Method B), then:

    1. Firstly, ensure you have followed the steps in section 3.5of this document. If not, go back and follow those steps.

    2. Open the “appsetings.Initial.json” in a text editor such as Notepad. Open the file this using the “As Administrator” option, otherwise you will be unable to write changes.

    3. Find the following text in the file: "LdapAdminUserDn": "****".

    4. Replace "****" on that line (excluding the quotation marks) with the name of the admin user you created in section 3.4, using the format "username@domain.tld".

    5. Find the following text in the file: "LdapAdminUserPassword": "****".

    6. Replace "****" on that line (excluding the quotation marks) with the password for the above administrative user.

  2. Restart the VeroLink Service

The initial Client Secret will be replaced with a new randomly generated secret created by the VeroLink client after initialisation.

Final Step

Further Information about VeroLink

Initial encryption occurs the first time the application is launched. An initial configuration file with unencrypted parameters must be provided in the appsetting.Initial.json file. After running the application and encrypting the settings in the appsettings.Production.json file, the original appsettings.Initial.json file is no longer needed for the application and should be moved from the application working folder to any safe location.

Validating the integration

To validate the integration you will need to Set up a Workstation for use with VeroGuard and complete a login to a one of the User Accounts you added to the VeroControlled Group, using the user’s assigned VeroCard (see the VeroGuard Admin Guide for more information). The User will need to complete their Account Activation before a successful login can be attempted.

Installation of Serenity Login can be comepleted without impact to the end user even before they have been issued with a VeroCard. Users can click on the “Enter Password Manually” link to enable a password box on the screen instead of the VeroCard selector dropdown.

Adding the users to the VeroControlled Group in AD does not impact users (apart from not being able to manually change ther passwords) so can be completed prior to the end user rollout of VeroCards.

On Activation and once they have successfully set their PIN, VeroGuard will take over control of the users account and password. From this point on Users will need to use the VeroCard to access their PC and other integrated applications.

JavaScript errors detected

Please note, these errors can depend on your browser setup.

If this problem persists, please contact our support.